Working with Overlay clips
Adding multiple Overlay Tracks gives you more creative possibilities for your movie. You can superimpose clips over a background video with portions of the overlay being transparent or add objects and frames to your video. Achieving different effects for your projects can be easy when you know how to use Overlay clips and tracks.
Trimming Overlay clips
You can trim a clip in the Overlay Track like the way you trim a clip in the Video Track. To cut clips in the Video and Overlay Tracks all at once, select Project as the Play mode and then drag the slider to the part you want to cut. Click ![]() .
.
Repositioning the current Overlay clip
Click to select the Overlay clip on the Timeline.

After clicking the Attribute tab, drag the Overlay clip to the desired area on the Preview Window. It is recommended that you keep the Overlay clip within the title safe area.
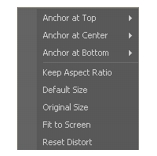
You can also click Alignment Options in the Attribute tab to open a menu where you can automatically place the Overlay clip in a preset position on the video. Here, you can also resize the Overlay clip to keep the aspect ratio, revert it to the default size, use the original size of the Overlay clip, or resize it to occupy the entire screen.
Resizing an Overlay clip
After clicking the Attribute tab, drag a handle on the Overlay clip on the Preview Window to resize it. If you drag a yellow corner handle, it will keep the aspect ratio when you resize the clip.

It is recommended that you keep the Overlay clip within the title safe area.
The Keep Aspect Ratio in Attribute Options resizes the Overlay clip based on the width or height, depending on which is longer in length, of the Overlay clip.

Note: When you resize or distort the Overlay clip then go back to the Edit tab, the clip will appear to have resized back to its original size. This is only for editing purposes, the Overlay clip retains its properties.
Distorting an Overlay clip
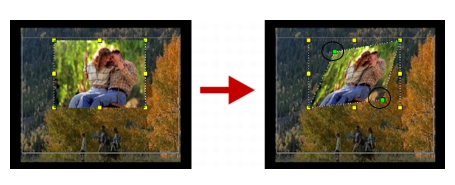
Each corner of the marquee of the Overlay clip have green nodes which you can use to distort the Overlay clip. Drag the green nodes to distort the Overlay clip.

Tip: Hold [Shift] while dragging the green nodes to keep the distortion within the current clip’s marquee.
Applying motion to the Overlay clip
After clicking the Attribute tab, select where the Overlay clip will Enter and Exit the screen under Direction/Style. Click a specific arrow as to where you want your clip to enter and exit in your movie.
Tip: Pause Duration determines how long your pause will be in the designated area before the clip exits the screen. If you applied motion to the Overlay clip, drag the Trim handles to set the Pause Duration.
