Burning video discs
Click Create Disc in the Options Panel to output your project (together with other VideoStudio projects or videos) to create an AVCHD, Blu-ray, DVD, VCD or SVCD.
In the dialog box that opens, first choose an output format. Second, decide whether you want to add other projects and videos. See the following sections for more information.
Notes:
· Your entire VideoStudio project can be brought into the Create Disc dialog box for burning even if you did not save it first as a *.vsp file.
· Video will be adjusted to the correct aspect ratio (as specified in the Disc Templates Manager dialog box), and automatically letterboxed or pillarboxed to fit the correct aspect ratio.
Assembling files
Import videos or VideoStudio project files (*.vsp) you want to include in your final movie.
To add videos:
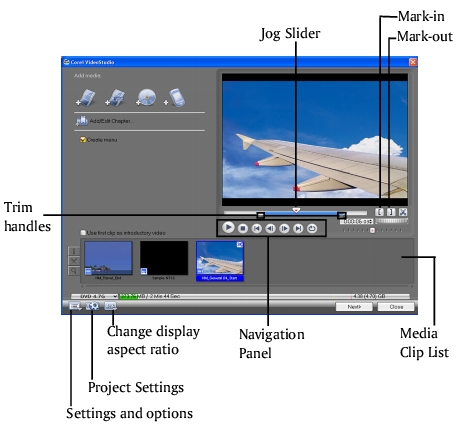
1 Click Add video files. Locate the folder where the videos are, and then select one or more video clips you want to add.

2 Click Open.
Note: After a video clip is added to the Media Clip List, sometimes you may see a black thumbnail. This is because the first scene (frame) of this video clip is a black screen. To change it, double-click to select this video clip and move the Jog Slider to the scene you want. Next, right-click the thumbnail and select Change Thumbnail.
To add VideoStudio projects:
1 Click Add VideoStudio project files.
Locate the folder where the projects are, and then select one or more video projects you want to add.

2 Click Open.
You can trim a video and VideoStudio project using the Jog Slider, mark-in/out, and navigation controls. Trimming a video gives you the freedom to precisely edit the video length.
Tip: You can also add videos from DVD/DVD-VR discs.
Adding/Editing chapters
This feature is only available when the Create menu option is selected. By adding chapters, you can create submenus linked to their associated video clip.
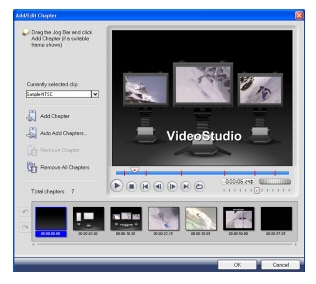
Represented as a video thumbnail in a submenu, each chapter is like a bookmark for a video clip. When viewers click on a chapter, the playback of the video will start from the selected chapter.
Notes:
· You can create up to 99 chapters for a video clip.
· If the Create menu option is not selected, you will be guided to the preview step immediately without creating any menus after clicking Next.
· When you are creating a disc with only one VideoStudio project or one video clip, do not select Use first clip as introductory video if you want to create menus.
To create or edit chapters linked to a video clip:
1 Select a video in the Media Clip List.
2 Click Add/Edit Chapter.
3 Drag the Jog Slider to move to a scene to set it as a chapter then click Add Chapter. Or, click Auto Add Chapters to let VideoStudio automatically select chapters.
Tips:
· If you want to use Auto Add Chapters, your video must be at least one minute long or the video has scene change information.
· If you click Auto Add Chapters and your video is a DV-formatted AVI file captured from a DV camcorder, Corel VideoStudio can automatically detect scene changes and add chapters accordingly.
· If the selected video is an MPEG-2 file with scene change information, Corel VideoStudio automatically generates these chapters for you when you click Auto Add Chapters.
4 Repeat Step 3 to add more chapter points. You can also use Remove Chapter or Remove All Chapters to delete unwanted chapters.
5 Click OK.
Creating selection menus
In this step, you can create the main menu and submenus. These menus provide an interactive screen for your movie
viewer to choose which video to watch. Corel VideoStudio includes a set of menu templates for you to create your menus and submenus.
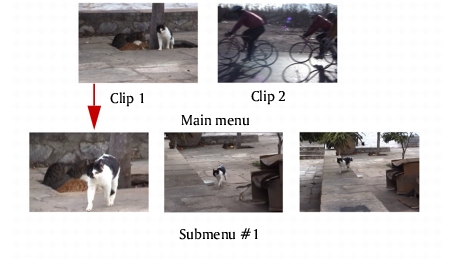
In this example, Clip 1 has three chapters so when you click the Clip 1 video thumbnail, it will jump to submenu #1. If you look at Clip 2, it has no chapters assigned to it so when you click Clip 2, the video will start playing from the beginning.
To edit menus:
1 By default, VideoStudio automatically makes all required menus for you. Use Currently displayed menu to switch to the menu you want to edit.
2 In the Gallery tab, click Menu template category and select a specific category. Click a particular template to apply.
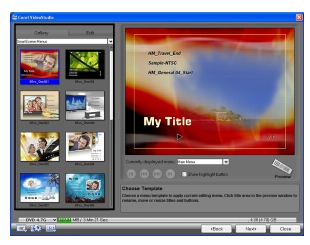
3 Click My Title to customize the menu heading. You can also click the text description under each video thumbnail for customization.
Note: If you do not modify “My Title” and the thumbnail descriptions or skip Step 2, there will be no menu heading and thumbnail text in the final output.
4 In the Edit tab, you can further customize your movie by adding background image, music or audio and by modifying font properties.
Tips:
· Select Motion Menu to enable motion attributes to the selected menu template.
· Click Layout Settings to specify whether to apply layout to all pages of the menu, reset the page, or reset all pages of the menu.
· Click Advanced Settings to specify whether to add a title menu, create a chapter menu, or display the thumbnail numbers in the Chapter List.
· Click Customize to apply pan & zoom, motion filter and menu in and menu out effects.
5 When you’re done, click Preview to preview the movie.
Previewing
Now, it’s time to see how your movie looks like before you burn it onto a disc. Simply move the mouse and click Play to watch your movie and test the menu selection on your computer. Use the navigation controls here as you would on a standard remote control of a home DVD player.
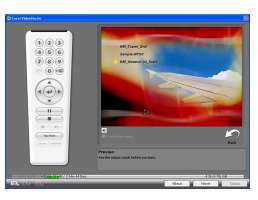
Tip: As you move between controls, a tool tip pops up and tells you its specific function.
Burning your project onto a disc
This is the final step in the disc creation process. You can burn your movie onto a disc, your preferred output or create a disc image file of your movie to save on your hard drive.
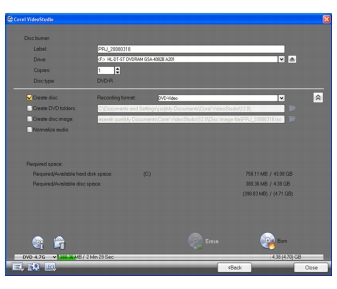
Tip: For details about the different disc formats, you can refer to Appendix C: Technology Overview – AVCHD, BD, DVD, VCD and SVCD.
To burn your movie onto a disc:
1 Click Next after you preview your project.
2 Click Show more output options to show available options for your project.
· Select Create DVD folders to create folders for your project and specify their location.
· Select Create disc image file to make an ISO image file of the DVD for later use.
· Select Normalize audio to make sure that irregular audio levels during playback are prevented.
3 Click Burning Options to define additional burner and output settings.
4 Click Burn to start the burning process.
5 After successfully burning your disc, a dialog box appears from which you can select the next step.
· Close: Prompts you to save your work and close Corel VideoStudio.
Burning options
· Disc burner: Specifies the settings for your burning device.
· Label: Enables you to enter a volume name of up to 32 characters onto the CD/DVD.
· Drive: Selects the disc burner that you want to use to burn the video file.
· Copies: Sets the number of disc copies to burn.
· Disc type: Displays the output disc format for the current project.
· Create to disc: Allows you to directly burn your video project onto a disc.
· Recording format: Select DVD-Video format to use the DVD industry standard. To quickly re-edit your disc without copying the file to the hard drive, select DVD-Video (fast re-editable) which still complies with the industry standard, and has very high compatibility when working with set-top home DVD players and computer DVD-ROM. Select DVD+VR for DVD players supporting this format.
· Create DVD folders: This option is only enabled when the video file being created is a DVD-Video. The files created are in preparation for burning the video file to a DVD. This also allows the user to view the finished DVD file on the computer using a DVD-Video player software.
· Create disc image: Select this option if you plan to burn the video file several times. By selecting this option, you don’t have to generate the file again when you want to burn the same video file.
· Normalize audio: Select to prevent irregular audio levels during playback of your movie. Different video clips may have different audio recording levels when created. When these video clips are put together, the volume could vary greatly from one to another. To make volume levels consistent between clips, Normalize audio function evaluates and adjusts the audio waveform of the whole project to assure a balance audio level throughout the video.
· Erase: Deletes all the data in the rewritable disc.
· Burning Options: Adjusts the advanced output settings for burning your project.
· Delete temp files: Removes all unnecessary files in your working folder.
· Burn: Begins the recording process.
· Required space: Serves as a reference in burning your projects. These indicators help determine if you have sufficient space to successfully burn your project onto the disc.
· Required/Available hard disk space: Displays the space needed by the working folder of the project and the space available for use in the hard drive.
· Required/Available disc space: Displays the space needed to fit the video file in the disc and the space that is available for use.