Movie Wizard
If you are new to video editing or you want to quickly make a movie, you can use the VideoStudio Movie Wizard to assemble video clips and images, add background music and titles, then output the final movie as a video file, burn it onto a disc, or further edit the movie in VideoStudio Editor.
Step 1: Add video and images
Assemble your video and images into a movie.
To add video and images:
1 Click one the following buttons to add video and images to your movie.
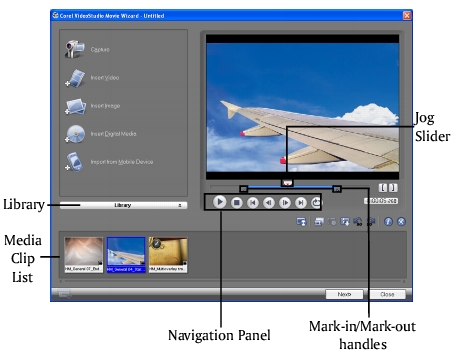
Tip: Click Library to open the media library that contains media clips that come with VideoStudio. To import your own video or image files to the Library, click ![]() .
.
2 If you selected multiple clips, the Change Clip Sequence dialog box will appear where you can arrange the order of the clips.
Drag the clips to the desired sequence then click OK.
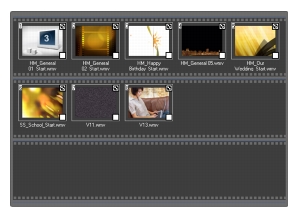
3 The video and image clips that you selected for your movie will be added to the Media Clip List. Right-click a clip to open a menu with more options.

Tip: You can also arrange clips in the Media Clip List by dragging them to the desired sequence.
4 To preview the clips, select each clip in the Media Clip List and use the Jog Slider and Navigation Panel buttons. When trimming a clip, drag the Mark-in and Mark-out handles to select the desired start and end points of the clip.
You can also click ![]() to recover lost DVB-T frames during DVB-T video capture.
to recover lost DVB-T frames during DVB-T video capture.
Click ![]() to choose desired segments from a video file and extract them to the Media Clip List.
to choose desired segments from a video file and extract them to the Media Clip List.

Click ![]() to automatically split video clips into smaller clips based on their shooting date and time.
to automatically split video clips into smaller clips based on their shooting date and time.
You can also click ![]() to sort clips in the Media Clip List according to their name or date.
to sort clips in the Media Clip List according to their name or date.
To capture video and images:
1 Connect your camcorder to your computer and turn on the device. Set it to Play (or VTR / VCR) mode.
2 In VideoStudio Movie Wizard, click Capture.
3 Check if your camcorder is selected in the Source list.
4 Select the video file format to use for saving captured video files from the Format list. Specify the Capture folder in which to save the files.
5 Choose Split by Scene to separate scenes in your DV video clip into several clips based on frame content or shooting date and time.
Note: Click Options to customize capture settings specific to your video device.
6 Play the videotape in your camcorder, and position the tape on the part of the video where to start capturing.
Tip: If you are capturing video from a DV or HDV camcorder, use the Navigation Panel to play your videotape.
7 Click Capture Video to start capturing. Click Stop Capture or press [Esc] to stop capturing.
8 To capture a still image from the video footage, pause the video on the desired image then click Capture Image.
9 Click Enable/Disable Audio Preview to play or stop DV audio preview while capturing.
Step 2: Select a template
Select a movie template to apply to your project. Each template provides a different theme which comes with preset start and ending video clips, transitions, title and background music.
Notes:
· To save your project, click ![]() then select Save.
then select Save.
· If you accessed VideoStudio Movie Wizard from within VideoStudio Editor, the above button will not appear and you will have to save from the File Menu when you go back to the editor.
To apply a Theme template:
1 Select a theme template from the Theme template list.
Home Movie templates allow you to create movies that include both video and images while Slideshow templates are used exclusively for creating image slideshows.
2 To set the overall length of your movie, click ![]() .
.
For Home Movie, specify the following options in the Duration dialog box:
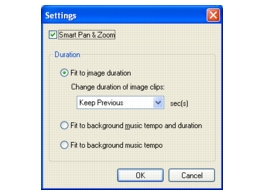
For Slideshow templates, specify Smart Pan & Zoom in the Settings dialog box. Smart Pan & Zoom automatically focuses the pan and zoom motion to important parts of the image like the face.

· Fit to image duration: Trims the background music to fit the total duration of the slideshow.
Tip: Select Keep Previous to use the image duration you set in the previous page of the Movie Wizard.
· Fit to background music tempo and duration: Adjusts the duration of each clip
and the total duration of the slideshow to fit the background music’s tempo and duration.
Note: A prompt will be displayed if the images’ total duration is longer than the music. Select Yes to automatically drop images in excess of the music’s duration or No to select another background music. A longer music duration will result to the repetition of images to fit the duration of the music.
· Fit to background music tempo: Adjusts the duration of each clip to fit the background music’s tempo.
3 For Home Movie templates, click ![]() to open the Mark Clips dialog box. Select a clip then click Must or Optional to specify whether or not to include the clip in the show.
to open the Mark Clips dialog box. Select a clip then click Must or Optional to specify whether or not to include the clip in the show.

Note: Click Auto to let the program decide which clips to retain or exclude.
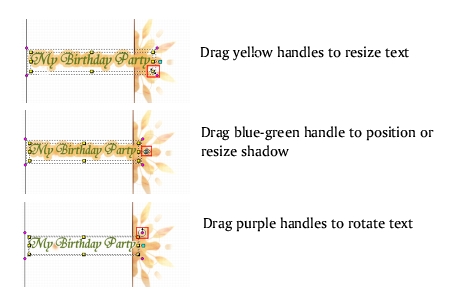
4 To replace the title, first select the preset title from the Title list. Double-click the preset text in the Preview Window and then type in your text.

5 Click ![]() to change text formatting.
to change text formatting.
In the Text Properties dialog box, select a font type, size and color for the text, and set the desired shadow color and transparency.
6 To replace the background music, click ![]() to open the Audio Options window. Locate and select the desired music file.
to open the Audio Options window. Locate and select the desired music file.
Click ![]() to specify music file settings.
to specify music file settings.
Note: Make sure that your background music is 30 seconds or longer if you want to fit the video to the music. If the music duration is less than 30 seconds, the music will not be looped leaving the remaining video without any background music.
7 Use the Volume slider to adjust the volume of the background music with respect to the video’s audio. Dragging the slider to the left increases the volume of the background music and decreases the volume of the video’s audio.
8 Click Next.
Note: If you opened the VideoStudio Movie Wizard within VideoStudio Editor, clicking Next will skip the last step and directly insert the clips onto the Timeline in the VideoStudio Editor.
Step 3: Finish
Select how to output the final movie:

 /videostudio/en/source/images/gettingstarted_wizard17.jpg" height="47" width="58" border="0" hspace="0" vspace="0">
