VideoStudio Editor
VideoStudio Editor provides a step-by-step workflow that makes creating movies simple and easy.
This section introduces you to the VideoStudio Editor interface and briefly explains the steps involved in creating a movie. Refer to the succeeding chapters for more in-depth information on each step.
The user interface

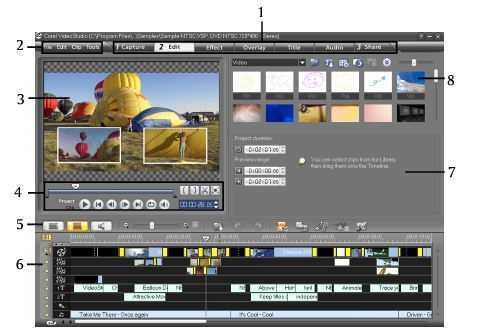
1 Step Panel
Contains buttons that correspond to the different steps in video editing.
2 Menu Bar
Contains menus that provide different set of commands.
3 Preview Window
Shows the current clip, video filter, effect, or title.
4 Navigation Panel
Provides buttons for playback and for precision trimming of clips. In the Capture Step, this also acts as the device control for the DV or HDV camcorder.
5 Toolbar
Contains buttons for switching between three project views and other quick settings.
6 Project Timeline
Displays all the clips, titles, and effects included in your project.
7 Options Panel
Contains controls, buttons, and other information that you can use to customize the settings of the selected clip. The contents of this panel change depending on the step you are in.
8 Library
Stores and organizes all of your media clips.
Notes:
· To change the user interface layout, click Preferences: UI Layout.
· You can scale the layout of the user interface. Splitters between the Preview, Library and Timeline windows can be scaled. Drag the splitters and resize windows according to your editing preferences.
The Step Panel
VideoStudio simplifies the process of creating movies into seven simple steps. Click the buttons in the Step Panel to switch between steps.
The Menu Bar
The Menu Bar provides various commands for customizing VideoStudio, opening and saving movie projects, working with individual clips, and more.
The Navigation Panel
The Navigation Panel is used to preview and edit the clips used in your project. Use the Navigation Controls to move around a selected clip or your project. Use the Trim Handles and Jog Slider to edit your clips.
When capturing video from a DV or HDV camcorder, the Navigation Controls are used for device control. Use these buttons to control your DV or HDV camcorder or any other DV device.

The Toolbar
The toolbar allows you to easily access buttons for editing. You can change your project view or zoom your project timeline by adjusting your Timeline ruler. Click Smart Proxy Manager to speed up editing of your HD videos and other large source files. Or use the Track Manager to add more overlay tracks.

The Project Timeline
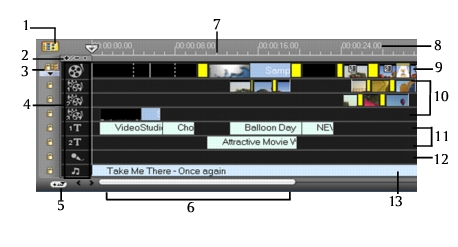
The Project Timeline at the lower part of the VideoStudio Editor window is where you assemble your movie project.
There are three types of views for displaying the Project Timeline: Storyboard, Timeline and Audio View. Click the buttons at the left side of the toolbar to switch between different views.

Storyboard View
Storyboard View is the fastest and simplest way to add video clips to your movie. Each thumbnail in the storyboard represents an event in your movie, an event being a video clip or a transition. Thumbnails show at a glance the chronological order of events in your project. The duration of each clip is shown at the bottom of each thumbnail.

You can drag and drop video clips to insert and arrange them. Transition effects can be inserted between video clips. A selected video clip can be trimmed in the Preview Window.
Timeline View
Timeline View gives you the most comprehensive display of the elements in your movie project. It divides a project into separate tracks for video, overlay, title, voice and music.

To switch to different tracks:
- Click a Step button in the Step Panel that corresponds to the track.
- Click the Track buttons.
- Double-click the desired track, or click a clip on the track.
Tips:
· The wheel mouse can be used to scroll through the Timeline.
· When the pointer is over the Zoom Controls or Timeline ruler, you can use the wheel to zoom in and out of the Timeline.
Audio View
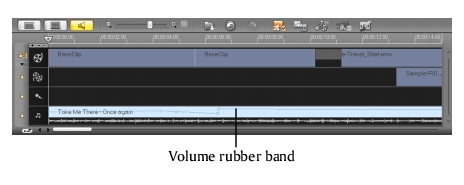
Audio View allows you to visually adjust the volume levels of video, voice and music clips.

Clips that contain audio are displayed with a Volume rubber band that you can click and drag to adjust their volume.
The Options Panel
The Options Panel changes depending on the program’s mode and the step or track you are working on. The Options Panel may contain one or two tabs. The controls and options in each tab vary, depending on the selected clip.
The Library
The Library is a storage depot for everything you need to create a movie: video clips, video filters, audio clips, still images, transition effects, music files, titles and color clips. These are collectively known as media clips.
Tips:
· You can print images directly from the Library. Right-click the image to print then select Print Image and select an image size.
· Right-click the image then select Print Options to specify print alignment and borders.
To add media clips to the Library:
1 Click Load media to open a dialog box for locating the media clip to insert in the Library.

2 Select the desired file. You can also import VideoStudio projects and media files from your hard drive into the VideoStudio Library. This can be found in the Project Video and Windows Media Library options in the Library drop-down menu.
Note: In using Windows Vista OS, VideoStudio automatically synchronizes with Vista Media Library during program startup. In this case, Library modification is not possible in VideoStudio and you need to modify Library content in the Vista Media Library.
3 Click Open when you are finished.
Notes:
· You can also drag and drop files from Windows Explorer straight to the Library.
· Right-click a clip in the Library to view the clip’s properties as well as copy, delete, or Split by Scene.

To delete media clips from the Library:
1 Select the clip to remove from the Library, then press [Delete].
Or, right-click the clip in the Library and select Delete.
2 When prompted, verify whether you want to delete the thumbnail from the Library.
Tips:
· Export your Library to avoid losing important library information and media clips.This action will create a backup of the virtual media files information of your current library in the directory you will specify. You can find this option on Tools:Library Manager – Export Library and specify your target location.
· You can also import your exported Library to restore media files and other library information. Click on Tools:Library Manager – Import Library and find the directory you specified.
· To reset your Library to the default settings, select Tools:Library Manager – Reset Library.
· Select the Smart search option in the Relink dialog box and VideoStudio will try to automatically locate and relink the files in your library.
Thumbnail Views
VideoStudio allows you to adjust the size of thumbnails to compensate for different monitor sizes and for easier access to the different media in the Library.

To adjust thumbnail size:
Move the slider to the left or right to decrease and increase thumbnail size, depending on your desired appearance. VideoStudio will keep the last thumbnail size you selected on your next session.
Library Organizer
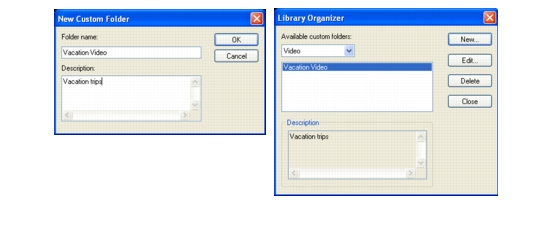
The Library Organizer organizes your custom Library folders. These folders help you store and manage all kinds of media files.
To use the Library Organizer:
1 Click ![]() to launch the Library Organizer dialog box and select Library Organizer from the drop-down list. Yo
to launch the Library Organizer dialog box and select Library Organizer from the drop-down list. Yo
u can also click on Tools:Library Manager-Library Organizer.
2 Select a media type from the Available custom folders list.
3 Click New to display the New Custom Folder dialog box and create a new folder. Specify a Library Folder name and a Description. Click OK.

Click Edit to rename or modify the description of a selected custom folder.
Click Delete to remove a selected custom folder from the Library.
4 Click Close.