Adding text
Corel VideoStudio allows you to add text either in multiple text boxes or in a single text box. Using multiple text boxes gives you the flexibility to position the different words of your text anywhere on the video frame and allows you to arrange the stacking order of the text. Use a single text box when you are creating opening titles and end credits for your projects.
To add multiple titles:
1 In the Options Panel, select Multiple titles.
2 Use the buttons in the Navigation Panel to scan your movie and select the frame where you want to add the title.
3 Double-click the Preview Window and type in your text.
Click outside the text box when you are done typing. To add another set of text, double-click again on the Preview Window.

4 Repeat step 3 to add more sets of text.
If you switch to Single title before adding to the Timeline the multiple text that you entered, only the selected text or the first text that you typed in (when no text box is selected) will be retained. The other text boxes will be removed and the Text backdrop and Rotate by degree options will be reset and disabled.
To add a single title:
1 In the Options Panel, select Single title.
2 Use the buttons in the Navigation Panel to scan your movie and select the frame where you want to add the title.
Double-click the Preview Window and type in your text.

3 In the Options Panel, set the Line spacing.
4 When you are done typing the text, click the Timeline to add the text to your project.
It is recommended to keep your text within the title safe area. The title safe area is the rectangular box on the Preview Window. By keeping the text within the bounds of the title safe area, the whole text will not be truncated when viewed on a TV screen. You can display or hide the title safe area by selecting File: Preferences – General tab – Display title safe area on Preview Window.
Adding preset text to your project
The Library contains various pre
set text that you can use for your projects. To use these preset text, select Title in the Gallery list then drag the preset text onto the Title Track.
Inserting subtitles to your project
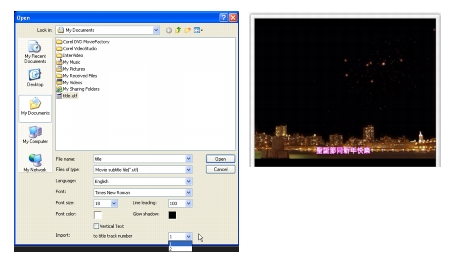
You can use your own movie subtitle files for your project. To insert your own, click Open Subtitle File. In the Open dialog box, locate the file you want to use and the target track and click Open.

Note: To open subtitles with non-English characters, select the appropriate option in Language.
You may choose to place your titles on separate title tracks by selecting from the Import: to title track number drop-down menu. To edit its text attributes, select the Font, Font size, Font color, Line leading and Glow shadow for your subtitles. You can also choose Vertical text to set the text orientation to vertical.
Saving subtitle files
Saving movie subtitles allows you to reuse them in the future. Click Save Subtitle File to open the Save As dialog box. Locate where to save your movie subtitle and the source track and click Save.
Notes:
· Movie subtitles will automatically be saved as *.utf files.
· To save subtitles in foreign languages like Chinese, Japanese or Greek, click Open Subtitle File in the Options Panel and browse for the particular file. Before you open the file, however, make sure you select the corresponding language in Language.